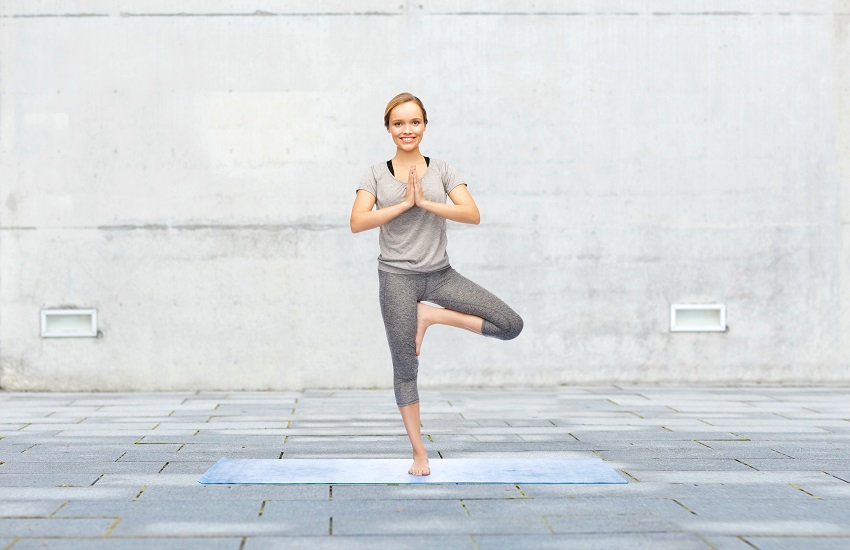
Tree pose: (Vrksasana)
Name: Tree Pose
Sanskrit: Vrksasana
Pronunciation: Vrik-SHAHS-anna
Pose Level: Intermediate
Step-by-Step:
- Start standing with your hands resting on your hips. Lift the toes of your right foot off the ground and try to create space between one toe and the others. Then, bring them back to the floor. At this point, bend your left leg and grab the ankle with the corresponding hand. Bring the sole of the foot towards the inside of the right thigh, with the heel close to the pubis and the toes facing downwards.
- Then, push your left knee back, but be careful to keep your hips on the same line. Press the foot against the thigh and the thigh against the foot.
- Now bring your hands in prayer in front of your chest or extend your arms upwards with your palms facing each other.
- Hold the position for 5 breaths and repeat on the other side. If you have difficulty finding balance, you can do this asana by approaching a wall and keeping your eyes on a fixed point on the wall.
Anatomy:
Legs
Core
Tree pose also brings awareness and allows for a great stretch to the inner thighs and opens the hips.
Pose Modifications:
Although the classic position of the tree requires the palms of the hands to be joined above the head, you can change their position as you like, depending on how comfortable you are. Here are some options.
Stretch your hands above your head and parallel to each other, palms are not joined at the same distance as the shoulders.
Extend your hands above your head, intertwine your fingers and turn your wrists outward brings your palms towards the ceiling
Stretch your arms along your body either with your palms facing it or facing forward. This way of positioning the arms allows a greater sense of balance.
Extend your arms behind your torso and interlace your fingers.
You could also keep your palms together in front of your heart.
A variation to simplify this position is to slightly lower the raised foot which should be kept as close as possible to the groin. However, you can lower the support point to where you feel comfortable. Above all, avoid excessive pressure on your straight knee. There should be a counterbalance of force between the bottom of the foot and thigh.
Contraindications:
Recent knee trauma. A chronic gait or balancing issues. Any recent history of hip injury.
It’s best to always seek expert help from a certified yoga instructor or medical expert if unsure about limitations.
Poses Commonly Transitioned too:
Poses Commonly Used Before Hand:
Mountain Pose