30 Minute Intermediate Yoga Routine:
Advancing in yoga is more than just perfecting poses; it involves a substantial mental aspect that’s often overlooked. True progress in yoga is about cultivating deep awareness of your body and responding to its signals. As we approach this “30-minute intermediate yoga routine,” remember, it’s a journey that engages both your body and mind.
Understanding when a pose is too demanding at a particular time is an indication of growth, not a setback. Yoga transcends the mere accomplishment of poses; it’s about the mindfulness to adapt an asana or build up to it gradually, staying present and authentic in the moment. Growth in yoga also includes learning to practice non-judgment towards oneself.
This 30-minute intermediate session aims to strengthen your physique while also honing your mental focus and potentially increasing your heart rate.
So, roll out your mat and get ready to engage both your physical and mental faculties. Let’s start!
Related Article: Good Morning Yoga! Here is a Quick 15 Minute Morning Yoga Routine!
Asanas To Try:
Eagle (Garudasana):
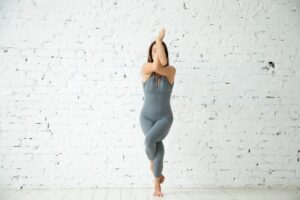
- Step 1: Start in Tadasana (Mountain Pose). Stand with your feet slightly apart, and let your arms hang naturally by your sides.
- Step 2: Inhale deeply.
- Step 3: As you exhale, bend your knees slightly, shifting your body weight to your left foot.
- Step 4: Inhale again.
- Step 5: Exhale and lift your right leg off the ground, finding your balance.
- Step 6: Cross your right leg behind your left calf to maintain balance.
- Step 7: Focus on your breath and fix your gaze on a point in front of you to help with balance.
- Step 8: Keep your back straight and shoulders relaxed.
- Step 9: As you inhale and exhale, bring your folded arms in front of your chest, with your palms facing forward. Interlace your fingers until your palms are joined.
- Step 10: Maintain a straight back and keep your gaze forward.
- Step 11: Hold this position for 15 breaths or until you feel comfortable and stable.
- Step 12: To release, return to the Mountain Pose.
- Step 13: Repeat the entire sequence on the other side, starting with the opposite leg.
- This step-by-step guide should help you perform the pose with proper alignment and
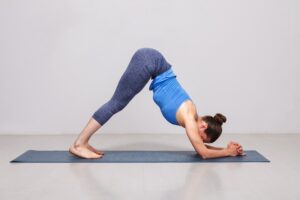
Dolphin Pose (Ardha Pincha Mayurasana):
Step 1: Start in a tabletop position on your hands and knees, with your wrists aligned under your shoulders and your knees under your hips.
Step 2: Lower down onto your forearms, keeping them parallel to each other. Your elbows should be positioned directly under your shoulders.
Step 3: Inhale deeply.
Step 4: As you exhale, tuck your toes under and lift your hips upward, straightening your legs. Your body should form an inverted V shape.
Step 5: Press your palms firmly into the mat, and keep your head and neck relaxed. Your gaze should be directed towards your feet or the floor between your hands.
Step 6: Hold the Dolphin Pose for 5 to 10 complete breath cycles. Breathe deeply and evenly.
Precautions: Avoid this pose if you have high blood pressure or neck problems. It’s important to prioritize safety and listen to your body during yoga practice. If you have any medical conditions or concerns, consult with a qualified yoga instructor or healthcare professional before attempting this pose.
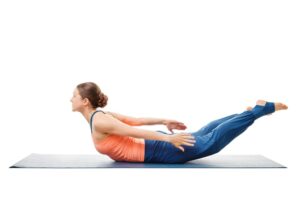
Locust Pose:
Step 1: Begin by lying on your stomach on a yoga mat.
Step 2: Place your palms on the ground, positioned at chest height. Bend your forearms and bring your elbows up, so they are in line with your shoulders. Keep your forehead resting on the mat, and ensure that your legs are straight and relaxed.
Step 3: Inhale deeply.
Step 4: As you inhale, gently lift your forehead, chin, shoulders, and chest off the ground. Use the strength of your back muscles to perform this lift. Keep your elbows close to your body.
Step 5: Contract your buttocks muscles while continuing to inhale, and lift your legs off the ground. Your toes should be pointing straight back.
Step 6: Continue to gently arch your back, maintaining the lift and stretch. Focus on breathing deeply and evenly.
Step 7: Hold this position for 5 complete breath cycles.
Step 8: Afterward, as you exhale, slowly bring your arms backward, stretching them parallel to the floor. Keep your legs lifted and toes pointing back.
Step 9: Hold the stretched arms position for 5 to 10 full breaths.
Precautions: It’s important to note that this position is not recommended for pregnant women and individuals with heart problems or those suffering from abdominal or inguinal hernia. Always prioritize safety and listen to your body during yoga practice. If you have any medical conditions or concerns, consult with a qualified yoga instructor or healthcare professional before attempting this pose.
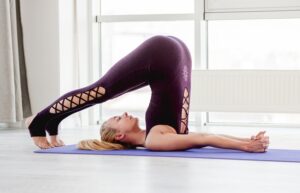
Plow pose (Halasana):
Step 1: Begin by lying on your back on a yoga mat with your legs together and your arms resting alongside your body.
Step 2: As you exhale, transition into a semi-inverted position by lifting your legs toward the ceiling. Use your hands to support your lower back in this position.
Step 3: Inhale and exhale deeply, focusing on your breath.
Step 4: Straighten your legs, aiming to bring them perpendicular to the floor while keeping your torso at a right angle to the floor.
Step 5: Slowly attempt to lower your toes toward the ground. Depending on your flexibility, your toes may or may not touch the ground.
Step 6: Continue to inhale and exhale while gently bringing your arms forward and placing your palms on the ground. This is the final position of the pose.
Step 7: Hold this position for as long as comfortable and beneficial for you.
Step 8: To return to the starting position, do so slowly by applying force through your hands to support your legs as they move back up toward the ceiling.
Precautions: It’s important to note that this pose is not recommended for individuals with back problems, particularly those experiencing neck pain. As with any yoga pose, be mindful of your own body and limitations, and consult with a qualified yoga instructor or healthcare professional if you have any concerns or medical conditions.
Quick Relief: Mastering the 2-Minute Breathing Exercise for Stress Reduction
Twist lunges (Parivrtta Anjaneyasana):
- Start in Downward Facing Dog (anchor) position.
- Then, Inhale and exhale bringing your right leg between your hands, flexing your right knee to 90 degrees. The knee is above the ankle, the left leg is stretched behind.
- Bring your torso forward and rotate outwards.
- Step 1: Begin by lying on your back on a yoga mat with your legs together and your arms resting alongside your body.
- Step 2: As you exhale, transition into a semi-inverted position by lifting your legs toward the ceiling. Use your hands to support your lower back in this position.
- Step 3: Inhale and exhale deeply, focusing on your breath.
- Step 4: Straighten your legs, aiming to bring them perpendicular to the floor while keeping your torso at a right angle to the floor.
- Step 5: Slowly attempt to lower your toes toward the ground. Depending on your flexibility, your toes may or may not touch the ground.
- Step 6: Continue to inhale and exhale while gently bringing your arms forward and placing your palms on the ground. This is the final position of the pose.
- Step 7: Hold this position for as long as comfortable and beneficial for you.
- Step 8: To return to the starting position, do so slowly by applying force through your hands to support your legs as they move back up toward the ceiling.
- Precautions: It’s important to note that this pose is not recommended for individuals with back problems, particularly those experiencing neck pain. As with any yoga pose, be mindful of your own body and limitations, and consult with a qualified yoga instructor or healthcare professional if you have any concerns or medical conditions.
- Inhale and exhale, bring the elbow towards the outside of the knee. Join your hands in the prayer position. Important: stretch your back, keep your shoulders open and your body well aligned.
- Hold for 5-10 breaths.
- Slowly return to the starting position, then perform on the other side.
Precautions: position not recommended for those with knee and back pain.
Head-To-Knee Forward Bend (Janu Sirsasana):
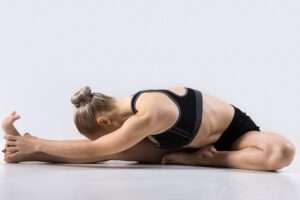
Step 1: Begin by sitting on the mat with your legs extended forward and your back straight. Your arms should be extended along your body, with your palms facing down.
Step 2: Bend your left leg, bringing the foot to the level of your right knee or groin if possible. Your right leg should remain extended forward.
Step 3: Inhale and extend your arms upward, reaching toward the ceiling.
Step 4: Exhale, and then inhale again, lengthening your spine and stretching upward.
Step 5: On the exhale, begin to lean forward. Initiate the movement from your lower back and hips, maintaining a straight spine.
Step 6: Reach forward with your hands, aiming to hold onto the shin of your right leg. If possible, you can also reach for your ankle or foot.
Step 7: Continue to move your head forward, bringing it toward your right leg.
Step 8: Hold the Janu Sirsasana pose for 5 to 10 full breaths, focusing on your breath and the stretch.
Precautions: Avoid this pose if you have knee or back problems, as it may exacerbate these issues. Always practice yoga mindfully and within your own comfort and physical limitations. If you have any concerns or medical conditions, consult with a qualified yoga instructor or healthcare professional before attempting this pose.
Final Thoughts!
As we conclude, it’s important to acknowledge that these asanas, along with numerous others, can be effectively integrated into a 30-minute intermediate yoga routine. It’s crucial to always be mindful of your personal boundaries as a practitioner.
Recognize your limits and approach each session with respect and care for your body and mind. Additionally, never underestimate the importance of focused breathing. The power of mindful breath acts as a grounding force, aiding you in navigating through the more challenging aspects of the practice with greater ease and stability.
As you continue on your yoga journey, remember to carry this awareness and respect for your practice, embracing each asana not just as a physical pose, but as a step towards deeper self-understanding and harmony.
Namaste.